
PiEEG-8
Brain-computer interface for EEG, EMG, and ECG bio-signals with 8 channels
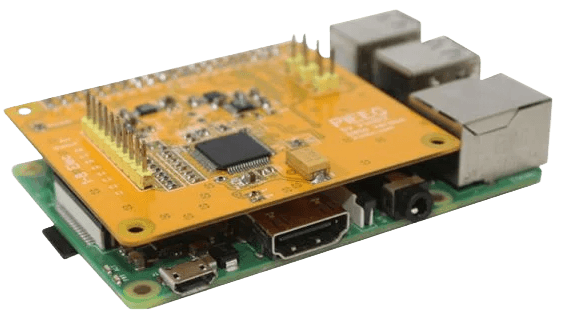
PiEEG-8
An 8-channel shield that turns a Raspberry Pi into a brain-computer interface.
PiEEG-8 reads EEG, EMG and ECG through an ADS1299 at 24-bit resolution. It sits on the Raspberry Pi’s 40-pin GPIO header and hands the data over SPI to PiEEG Server, which adds a browser dashboard, recording and integrations.
- Channels
- 8, plus REF and BIAS
- Signals
- EEG, EMG, ECG
- Converter
- ADS1299, 24-bit
- Sample rate
- 250 SPS to 16 kSPS
- Host
- Raspberry Pi 3, 4 or 5
- Power
- 5 V power bank only
Where to use it
PiEEG-8 goes wherever a Raspberry Pi and a power bank can go: a lab bench, a desk, a classroom. Pick a use case and try the live demo.
Simulated signal to show the effect. Real recordings are noisier.
How to set it up
Kit, power, shield, software, electrodes. Eight steps from the box to a live signal, with the two checks that keep PiEEG-8 safe built in.
- 1
Gather the kit
PiEEG-8 is a shield, so it needs a Raspberry Pi to sit on and a power bank to run from.
- 2
Choose the power source
PiEEG-8 has no isolation circuitry between the electrodes and the power supply. The only safe source is a 5 V battery, so the whole setup runs from a power bank.
Use a power bank with 5 V output, at least 3 A and no more than 10,000 mAh. Try each option below.
- 3
Mount the shield on the Raspberry Pi
With everything unplugged, line PiEEG-8 up with the Pi’s 40-pin GPIO header and press it down evenly until every pin is seated.
The usual mistake is a shield shifted by one pin. Try both below.
- 4
Install PiEEG Server
PiEEG Server reads PiEEG-8 over SPI and gives you the dashboard, recording and integrations. Install it on the Raspberry Pi.
On a Raspberry Pi that has never used SPI, reboot once after installing: the reboot switches SPI on.
- 5
Connect the electrodes
Plug the eight channel electrodes into the header, clip the reference to one earlobe and the bias to the other. For EEG they go on a cap at 10-20 positions; for EMG and ECG see the placements in Where to use it.
This is a common 8-channel layout. Follow the pin labels on the board and the connection diagram in the PiEEG-8 quick start manual on GitHub. Keep the cables short.
- 6
Power on and start streaming
Connect the power bank to the Raspberry Pi. When it has booted, start PiEEG Server with the PiEEG-8 driver and open the dashboard from any browser on the same network.
If something doesn’t work,
pieeg-server doctorchecks the hardware, SPI and configuration and tells you what to fix. - 7
Check the signal
Running from a power bank keeps PiEEG-8 away from the mains, which removes most hum. The rest comes down to contact and movement.
PiEEG Server can band-pass the stream from 1 to 40 Hz before it reaches the dashboard and your code.
# stream with the 1 to 40 Hz band-pass
pieeg-server --device pieeg8 --filter
- 8
Record and stream
Record on the Pi, or pull the live stream into your own code on the Pi or another computer on the network.
PiEEG-8 also works with the classic Python scripts and with the BrainFlow library. See the PiEEG-8 software page in the documentation.
Before you put it on anyone
- PiEEG-8 is not a medical device and isn’t certified by any regulator. It’s for education, research and engineering, never for diagnosis or treatment.
- Power PiEEG-8 only from a 5 V battery. Never from the mains, a wall charger or a computer’s USB port: the board has no isolation circuitry.
- While electrodes are on a person, keep everything connected to the Raspberry Pi on the power bank too, including the monitor.
- The electronics are exposed. Handle the board with anti-static care, and mount or remove the shield only with the power off.
- Don’t use it with a pacemaker or other implanted device without asking a physician. Stop if the skin becomes irritated.